How to Amalgamate Choices/Levels (in Options)
Note: there are 2 ways in which you might 'amalgamate' in Options - this is method A (before creating a pattern)
You can ‘amalgamate’ (or combine) specific subject choices, if you wish to, or if it becomes necessary.
A Examples of when you might wish to do this amalgamating:
- Example 1: a Scottish school might offer Biology at ‘National 4 Level (N4)’ and at ‘National 5 Level (N5)’. Each Biology student chooses one or the other. However, later, due to student group numbers (or staffing problems) you decide that Biology N4 & N5 must be taught as one single group.
To see more details of this scenario, open the HelpScreens in the program and type amalgamate into the Index box of the HelpScreen.
- Example 2: a 6th Form College may wish to merge 2 similar (but uneconomical) courses.
- Example 3: an IB school offers History at ‘Standard Level (SL)’ and at ‘Higher Level (HL)’ but for the Options process wants them to be treated as a single group.
To deal with this Example 3 scenario:
- Enter 2 subjects (on the Subjects Screen) as usual: ‘HistSL’ and ‘HistHL’.
- The students choose ‘HistSL’ or ‘HistHL’ (and trial patterns can be built as usual).
If you decide that the 2 groups must be amalgamated,
1) First add a new subject. For example: ‘Hist’ (on the Subjects Screen).
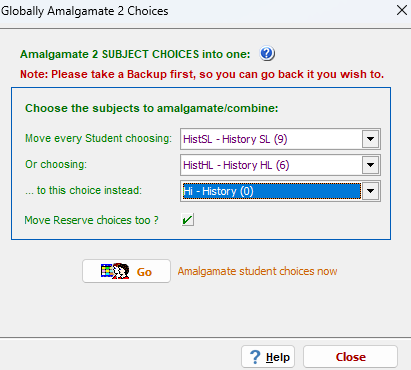
2) On the Students & Choices Screen, choose: Tools -> Amalgamate Choices or Levels … and then choose as shown here:
Notes:
- Take a Backup file before you start, so you can go back if you need to.
- To move just one subject, leave the other box empty. To amalgamate more than 2 subjects, repeat the process.
- You don't have to create a new Subject like 'Hist' ...in the example above you could add the 'SL' students into the 'HistHL' group ...but then it would be labelled misleadingly.
- If your students have made Reserve choices you will be asked if you want to include them.
- If you just want to merge 2 groups in the same Block (ie. without using AutoCreate again) then you can use Current Pattern -> More -> Merge.
- At the end of the process, you are offered an Excel file, listing the changes you’ve made and the pupils' original Choices ... you should Save or Print this ...you may need it later to ensure that your MIS (eg. SEEMiS) is correct for exam entries. Heads of Subject may also need a copy of this list, so they know what the pupils originally chose.
B Viewing the original choices a student made (ie. from before you amalgamated):
For example, when you Amalgamate HistSL & HistHL -> Hist: behind the scenes, Options keeps a note of which students wanted HistSL and which HistHL.
You can view the original choices at any time by the various menu items at the bottom of the 'Basic Data' top menu, which are as follows:
| Amalgamate choices |
Runs the Amalgamate feature |
| Review last amalgamations report |
Reopens the Excel file created when you last amalgamated – as long as you left it in the default folder |
| Original Choices -> View Student Choices (Report) |
Creates a similar report to ‘Students -> Print -> Student Choices’ but with original subject choices shown (in pink). Note: you can ‘Export to -> Excel’ if you wish. |
| Original Choices -> View Assignments to Groups (Report) |
Creates a similar report to ‘Print -> Student Choices -> Student Assignments’ but with original subject choices shown alongside each TGN. Useful for exporting to SEEMiS (for example). Note: you can ‘Export to -> Excel’ if you wish. |
| Original Choices -> Clear |
Clears the note made about each student’s original choices. Only use if you want / are about to have a fresh start. |
These features (especially the 2 reports) could be useful if you wish:
- … to split the Hist group back into 2 groups on the Current Pattern
- … to export to your MIS (eg: SEEMiS) and populate your groups in your MIS
- … to counsel a student on his/her choices
- … your teachers to see which students (at which level) are in their groups
- … “undo” your amalgamation, for any reason
- etc
And on the 'Students *& Choices' screen, if you hover over a Student, you will see (for example)
1. Hist (orig: Geog)
... meaning that the student's 1st choice is 'Hist', but was originally 'Geog'.
C Should I run 'Amalgamate' before or after creating my pattern ?
Either is possible, but before has extra benefits: if you do it pre-pattern creation, then you won’t need all the pattern Rules trying to constrain (for example N4 & N5 subjects) into the same block – so AutoCreate will work faster and be simpler, and perhaps find a better solution.
But if you decide (or need) to use Amalgamate post-pattern creation (ie. you already have an existing pattern which you wish to keep), then (as well as AutoCreate being slower), you should follow the steps in the separate article "Amalgamate Method B" - search for'Amalgamate' or click here.
Any questions; please ask the Support Centre.
By the TimeTabler Team