How to 'Roam' a Group in Options
When working on your Current Pattern, with a group highlighted (in the example below, it is Spanish), you can explore what would happen if you moved the Group from this Block to another Block. Just click on Roam:
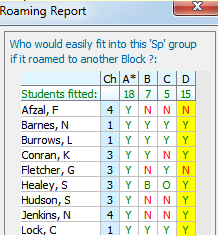
You will see a report like this:
For each Student and Block, you see one of 4 possible codes:
Y = Yes, the student will fit in this group if it moves to the new Block
N = No, the student won’t fit in this group if it moves to the new Block
O = Yes, the student will fit …but there is another group of this same Subject in that block, and the ‘Equalise’ function would place him/her in the other group (but you can shuffle students between the 2 groups to get a different balancing of students if you wish).
B = Yes, fitted in a group of this subject but in a different block.
You can see that for this Spanish group:
• the current Block A is the best position (all 18 students fitted),
• second best would be in Block D (15 students would be fitted),
• if you moved the Spanish Group to Block D then Farzana Afzal [Spanish is her 4th ‘Ch’oice] and Gary Fletcher [his 3rd Choice] would not be able to study Spanish.
You can export the table to HTML or Excel if you wish to discuss it with the Head of Subject. If nevertheless you decided to move this Spanish Group to Block D then just:
• click on the ‘D’ column header, so the column turns yellow, and
• click on the Apply button,
and Spanish will be placed in Block D. You can then try ‘Roam’ on another group.
Note that ‘Roam’ does not take account of Max/Min Group Sizes.
None of the effects of using ‘Roam’ are saved until you ‘Close’ the screen and say ‘Yes’ you want to save the changes. Just say ‘No’ if you don’t want to keep the results of your experimenting.
Any questions, let us know.


By the TimeTabler Team